Hi everyone!
So
after a short break for Christmas I thought I'd take a step away from
portraiture and show you some of my still life work. I've also decided
to make my blogs more interesting by spending more time explaining both
the technical process of taking the image and the editing process in
case you wanted to try and use the techniques in future. I'm really not
being big headed here I'm just sharing some tips I use when
photographing and I'd be really interested to hear any tips you might
have for me as well so leave a comment if you have anything to add!
I
think the key to taking good still life images is good composition.
Positioning the object in a way that shows it off to the audience.
Aspects such as lighting and camera settings are also crucial elements
to consider when producing clear and impressive images.
Modern
cameras come often come with a selection of settings which allow you to
adjust the camera settings to suit the environment you're in. For still
life photography the setting you would be most likely to use is the
'Marco' setting which can be set by selecting the little Tulip icon on
your camera. This setting allows the camera to capture a lot more detail
in the object which could also add texture to your image. I would
advise you to use this option if you've only got a compact camera as it
will improve the quality of your shots. However, if you have a Digital
SLR camera then you have so many more options you can take to improving
the quality of your still life images.
Instead
of buying a special macro lens for your camera, I would advise you to
invest in a set of extension tubes for your camera. They come in sets of
three and you can use a combination of all three tubes, just two or
even just one to take your image depending on how much detail you want
to capture and how close us you want to get.
They're
much cheaper than another lens, a lot lighter so it's easier to carry
them around and they are so easy to use. All you need to do is once
you've decided which one(s) you want to use, just slot them onto the
body of the camera and apply the lens on top of them. Then you're ready
to take your image.
For all the final images I have on this post I have used extension tubes to take the images.
I
took this image earlier this year and the main thing I was focusing on
was the intense colour of the peppers and the chillies. I used a lots of
light to take the image because I wanted to make the colours appear
very vivid. I also used a white background because I knew samples of the
background would be visible in the image and I still wanted the image
to appear as bright as possible. Using extension tubes really helped me
frame the image excluding any bits of the image I didn't want the
audience to see.
With this image I mainly used the extension tubes to capture some of the detail and texture of the strawberry. There isn't really a lot I have to say about it, I just like the image.
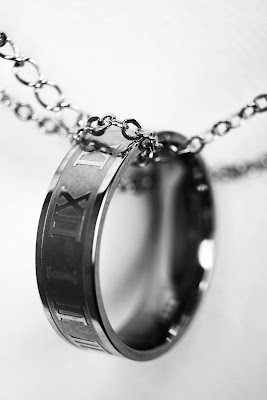
In
the project I'm continuing at the moment I decided to include a couple
of still life based shoots. Unfortunately, I used a really boring piece
of jewellery. I added the chain so I could position the ring differently
rather than just led on a table. I also used a white background with
lots of light to create an initial contrast between the ring and the
wall. Editing these images is what made them impressive. Always play
with the brightness and contrast levels of these sort of images, it can
make them appear really sharp and makes the detail stand out massively!
The
final images in this post are from one of my most recent shoots where I
decided to keep the ring as a focal point but add a bit of mystery to
them by including the model from my previous portrait shoots in the
image. Only difference is you can't see his face!
Thanks for reading, I'll be back soon!


No comments:
Post a Comment